This is a Japanese version of this post. (本投稿はリンク先の記事の日本語版となります。)
PI WebParts (PI TreeView + PI Graphic) behavior by PI Coresight 2016 R2
PI WebParts (PI TreeView + PI Graphic) の挙動をPI Coresight 2016 R2で実現したい場合があります。
TreeをHTMLで表示するにはPI Web APIが使用できます。ヘルプファイルにその方法の記載があります。
https://techsupport.osisoft.com/Documentation/PI-WEB-API/help/getting-started.html
以下の部分を確認してください。
--
A Simple Application
In this section, we'll develop a JavaScript application for exploring the AF hierarchy of your PI System. A basic knowledge of JavaScript, HTML, and CSS is assumed. The following is the complete code.
--
このコードを使用すればPI Tree Viewのようにツリーを表示できます。
PI ProcessBook DisplayをPI CoresightでTreeとともに表示するにはHTMLのFrameが使用できます。
2つのファイルを用意します。(F2の src= を自分のProcessBookDisplayのアドレスに変更してください。)
1 index.html
<!DOCTYPE html PUBLIC "-//W3C//DTD XHTML 1.0 Frameset//EN" "http://www.w3.org/TR/xhtml1/DTD/xhtml1-frameset.dtd">
<html xmlns="http://www.w3.org/1999/xhtml" xml:lang="ja" lang="ja">
 <frameset cols='20%,80%' id="main">
 <frame name="F1" src=".\AFTree.html" />
 <frame name="F2" src="https://CoresightServerName/Coresight/PB/#/PBDisplays/40102?HideToolBar">
 <noframes>
 <body>
 <p>The browser does not support frames</p>
 </body>
 </noframes>
 </frameset>
</html>
2 AFTree.html (PI Web APIのヘルプファイルを元に変更を加えました。 "F2"のframeにリンクするアドレスを追加しています。RootElementとDisplayPathは自分のものに変更してください)
<!DOCTYPE html>
<html>
<head>
 <title>AF Hierarchy Viewer</title>
 <script src="https://ajax.googleapis.com/ajax/libs/jquery/2.2.2/jquery.min.js"></script>
 <script type="text/javascript">
 //Please enter tree's root element's WebID address.
 var RootElement = 'https://khashimotoe6440.osisoft.int/piwebapi/assetdatabases/D0c_UDU9Pb-k6nVsZu0iuPpgKZD5gy4Ww0WeCfOWEZoj_wS0hBU0hJTU9UT0U2NDQwXFBJIEJJRyBUSVJFUyBDTw/elements';
 //Display path and CurrentElement
 var DisplayPath = 'https://khashimotoe6440/Coresight/PB/#/PBDisplays/40102?HideToolBar&CurrentElement=';
 var childrenMap = {
 Elements: ['Elements']
 };

 function node(name, type, links, parentDiv, path) {
 this.type = type;
 this.links = links;
 this.flipper = $('<span class="flipper">+</span>').click(flip.bind(this, this));

 parentDiv.append(this.flipper).append('<span class=" + type + "><a href="'+DisplayPath + path + '" target="F2">' + name + '</a></span><br />');
 this.div = $('<div></div>').hide().appendTo(parentDiv);
 }

 function loadChildren(n) {
 n.loaded = true;
 childrenMap[n.type].forEach(function(childCollection) {
 $.get(n.links[childCollection], function(collection) {
 n[childCollection] = collection.Items.map(function (item) {
 return new node(item.Name, childCollection, item.Links, n.div, item.Path);
 });
 });
 });
 }

 function flip(n) {
 if (!n.loaded) { loadChildren(n); }
 n.flipper.html(n.flipper.html() == '+' ? '-' : '+');
 n.div.toggle();
 }

 $(function() {
 root = new node('Elements', 'Elements',
 { Elements: RootElement }, $("#root"));
 });
 </script>
 <style type="text/css">
 div {
 left: 10px;
 position: relative;
 }
 .flipper {
 cursor: pointer;
 }
 </style>
</head>
<body>
 <div id="root"></div>
</body>
</html>
HTMLのFrame内でPI CoresightのDisplayを表示するために、web.configを変更します。
%pihome64%\Coresight\web.config
<add name="X-Frame-Options" value="Allow"/>
ローカルからindex.htmlを実行することもできますが、IISにあげることも可能です。
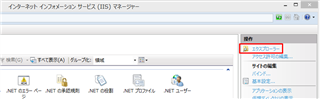
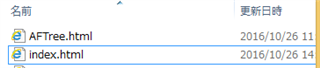
IISの新しいサイトを作成し、2つのファイル(index.html, AFTree.html) をサイトのエクスプローラーにあげます(エクスプローラーをクリック)
2つのファイルをExplorerに入れます。
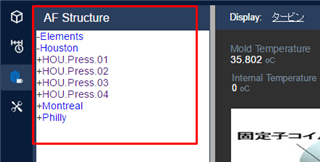
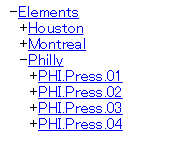
これでIISサイトにアクセスすることで、エレメント相対のPI ProcessBook Display +Treeが表示できます。
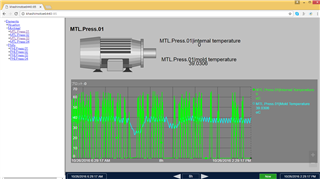
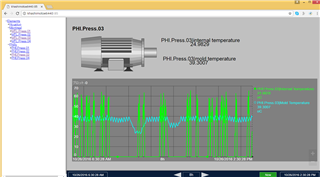
Philly > PHI.Press03をクリックすると、PHI.Press.03の情報が表示されます。
IISはSecurityを正しく構成する必要があります。(Windows認証など) PI Web APIにKerberosが通らないとエラーとなり、ツリーが表示されません。
Anonymousにすれば表示できますが、Kerberosを使用したいのでればSetSPNなど実行する必要も出てきます。
今回はProcessBookのDisplayと連携しましたが、PI CoresightのNative Displayと連携する場合、Asset=というパラメーターが使用できます。
PI Coresight 2016 R2はこのAssetパラメーターが動作します。よってNative PI Coresight Displayと連携させることも可能です。
(PI Coresight 2016はAssetパラメーターに問題があり動作しませんでした)
また、PI Coresightのカスタムシンボル内でPI Web APIを使用するにはPSAライセンス(PI System Access)は必要ないですが、
上記のようにフレームを分けてPI Coresightの外部でPI Web APIを使用する場合、本番環境であればPSAライセンスが必要な点にご注意ください。